springboot 需要配置 spring-boot-starter-jdbc吗?
8 个回答

一.引言
相信现在有很多小伙伴都已经很熟悉SpringBoot技术了。它大大地简化了Spring应用的开发,极大地提高了项目的开发效率,受到广大开发者和企业的青睐。特别是SpringBoot官方针对各种不同的应用场景,提供了非常丰富的场景启动器(也称为起步依赖)。开发人员只需要在项目的POM文件中导入对应的场景依赖,并编写少量的配置,即可快速实现当前场景的应用开发,真正的实现开箱即用。
今天威哥邀请建哥结合一个具体的案例来给各位小伙伴介绍一下,我们该如何自定义一个自己的SpringBoot场景启动器,毕竟有时候官方提供的starter不能完全满足我们所有的需求。同时也希望通过starter的自定义过程,能够加深大家对SpringBoot自动配置原理的理解。
二.需求说明
我们先来看一段代码:
package com.qf.hello.service;
import com.qf.hello.bean.HelloProperties;
import org.springframework.beans.factory.annotation.Autowired;
public class HelloService {
    @Autowired
    HelloProperties helloProperties;

    public String sayHello(String name){

        return helloProperties.getPrefix() + ":" +  name + ">>>"  + helloProperties.getSuffix();
    }
}
上面我们定义了一个组件HelloService,它有一个非常简单的功能,就是能够根据调用者传递的名字返回一个打招呼的信息,返回的信息内容可以根据配置的前缀和后缀进行指定格式的设置。我们现在需要将这个功能做成一个Starter,将来在其他项目中可以直接以场景启动器的方式导入并使用。
三.设计思路
回顾我们之前使用已经做好的starter,你会发现无非就是如下几个步骤:
- 在POM文件中导入场景依赖;
- 这个场景依赖中,包含了一个名为xxxAutoConfiguration的自动配置类;
- 自动配置类按照一定的条件进行相关组件的自动装配;
- 这些组件又绑定了名为xxxProperties属性配置类;
- 属性配置类通过指定的前缀,从application.yml配置文件中读取属性的配置信息;
- 最后在项目中直接使用这些配置好的组件。
我们就参考这个步骤开始进行自定义starter的操作。
四.实现步骤
1.Step1 业务定义
创建一个空项目【customer-starter】,里面包含两个模块:
- 启动器模块【hello-spring-boot-starter】;
- 自动配置模块【hello-spring-boot-starter-configuration】
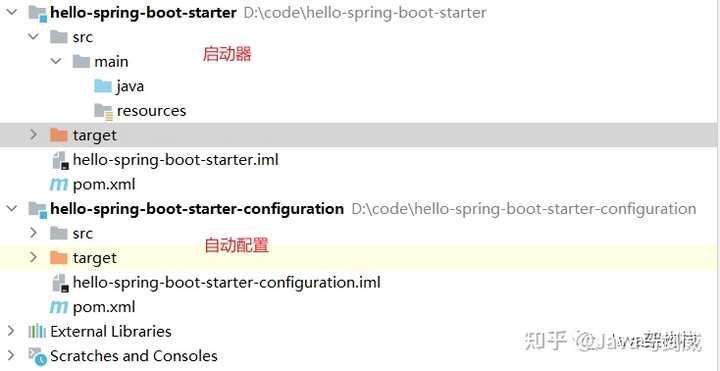
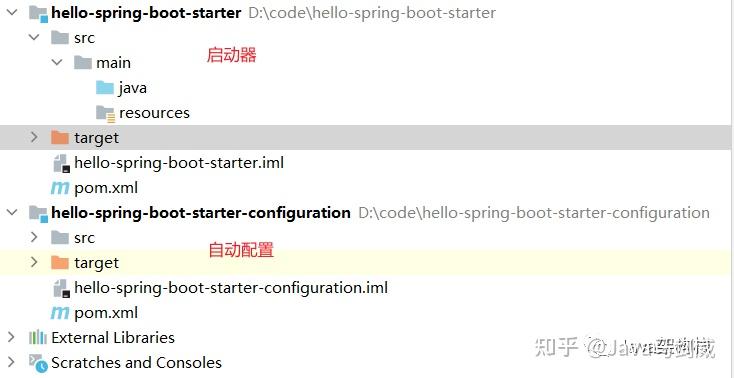
其中启动器项目中无需任何源代码和配置文件,只需要引入自动配置项目的依赖即可。
<?xml version="1.0" encoding="UTF-8"?>
<project xmlns="http://maven.apache.org/POM/4.0.0"
         xmlns:xsi="http://www.w3.org/2001/XMLSchema-instance"
         xsi:schemaLocation="http://maven.apache.org/POM/4.0.0 http://maven.apache.org/xsd/maven-4.0.0.xsd">
    <modelVersion>4.0.0</modelVersion>

    <groupId>com.qf</groupId>
    <artifactId>hello-spring-boot-starter</artifactId>
    <packaging>pom</packaging>
    <version>1.0-SNAPSHOT</version>
    <dependencies>
        <dependency>
            <groupId>com.qf</groupId>
            <artifactId>hello-spring-boot-starter-configuration</artifactId>
            <version>1.0-SNAPSHOT</version>
        </dependency>
    </dependencies>
</project>
自动配置项目必须是一个SpringBoot工程,同时需要引入spring-boot-starter的依赖。
<?xml version="1.0" encoding="UTF-8"?>
<project xmlns="http://maven.apache.org/POM/4.0.0"
         xmlns:xsi="http://www.w3.org/2001/XMLSchema-instance"
         xsi:schemaLocation="http://maven.apache.org/POM/4.0.0 http://maven.apache.org/xsd/maven-4.0.0.xsd">
    <modelVersion>4.0.0</modelVersion>

    <parent>
        <groupId>org.springframework.boot</groupId>
        <artifactId>spring-boot-starter-parent</artifactId>
        <version>2.4.5</version>
    </parent>

    <groupId>com.qf</groupId>
    <artifactId>hello-spring-boot-starter-configuration</artifactId>
    <version>1.0-SNAPSHOT</version>

    <dependencies>
        <dependency>
            <groupId>org.springframework.boot</groupId>
            <artifactId>spring-boot-starter</artifactId>
        </dependency>
    </dependencies>
</project>
2.Step2 自动配置
编写自动配置项目中的内容。
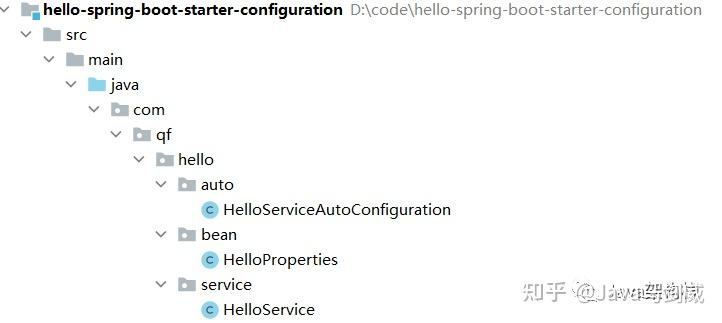

HelloService是整个自定义Starter要装配的核心对象,HelloServiceAutoConfiguration是一个配置类,HelloProperties是HelloService组件绑定的属性配置类,他们的代码分别如下:
2.1 HelloService类
//HelloService:该组件不要默认注册到容器中,而是通过一个自动配置类按条件进行装配
package com.qf.hello.service;

import com.qf.hello.bean.HelloProperties;
import org.springframework.beans.factory.annotation.Autowired;

public class HelloService {

    @Autowired
    HelloProperties helloProperties;
    public String sayHello(String name){
        return helloProperties.getPrefix() + ":" +  name + ">>>"  + helloProperties.getSuffix();
    }
}
2.2 HelloProperties类
//HelloProperties:自配配置属性类
package com.qf.hello.bean;

import org.springframework.boot.context.properties.ConfigurationProperties;

@ConfigurationProperties(prefix = "hello")
public class HelloProperties {
    //sayHello方法使用的前缀信息
    private String prefix;
    //sayHello方法使用的后缀信息
    private String suffix;

    public String getPrefix() {
        return prefix;
    }

    public void setPrefix(String prefix) {
        this.prefix = prefix;
    }

    public String getSuffix() {
        return suffix;
    }

    public void setSuffix(String suffix) {
        this.suffix = suffix;
    }
}
2.3 HelloServiceAutoConfiguration类
//自动配置类
package com.qf.hello.auto;

import com.qf.hello.bean.HelloProperties;
import com.qf.hello.service.HelloService;
import org.springframework.boot.autoconfigure.condition.ConditionalOnMissingBean;
import org.springframework.boot.context.properties.EnableConfigurationProperties;
import org.springframework.context.annotation.Bean;
import org.springframework.context.annotation.Configuration;

@Configuration
@EnableConfigurationProperties(HelloProperties.class)
public class HelloServiceAutoConfiguration {

    @ConditionalOnMissingBean(HelloService.class)
    @Bean
    public HelloService helloService(){
        System.out.println("使用自定义starter提供的HelloService");
        return new HelloService();
    }
}
3.Step3 工厂文件
在自动配置项目中的resources目录中,提供一个名称为META-INF的目录,并在该目录下提供一个名为spring.factories的文件。
resources/META-INF/spring.factories

spring.factories配置的内容如下:
org.springframework.boot.autoconfigure.EnableAutoConfiguration=
\com.qf.hello.auto.HelloServiceAutoConfiguration
4.Step4 安装
将这两个项目clean,并install到本地仓库。
5.Step5 引入使用
创建一个web项目进行自定义starter的使用测试。
5.1 在应用中添加自定义starter依赖坐标
<dependency>
    <groupId>com.qf</groupId>
    <artifactId>hello-spring-boot-starter</artifactId>
    <version>1.0-SNAPSHOT</version>
</dependency>
5.2 编写配置信息
server:
  port: 8080
hello:
  prefix: 千锋
  suffix: 888
5.3 编写测试的Controller
并在该Controller中自动注入自定义场景启动器中的HelloService组件。
package com.qf.boot.controller;

import com.qf.hello.service.HelloService;
import org.springframework.beans.factory.annotation.Autowired;
import org.springframework.web.bind.annotation.GetMapping;
import org.springframework.web.bind.annotation.PathVariable;
import org.springframework.web.bind.annotation.RestController;

@RestController
public class HelloController {

    @Autowired
    HelloService helloService;
    @GetMapping("/hello/{name}")
    public String hello(@PathVariable("name") String name){
        return helloService.sayHello(name);
    }
}
5.4 打开浏览器输入Controller中定义的访问地址

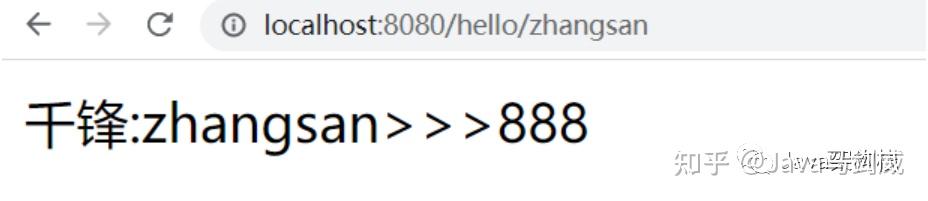
通过测试发现,我们已经可以在其他项目中使用自定义的starter,并使用自动配置好的组件功能了!现在你知道该怎么自定义starter了吗?如果你还有其他问题,可以在评论区留言哦。


1. pom
<!-- 达梦数据库驱动 -->
        <dependency>
            <groupId>com.dm</groupId>
            <artifactId>DmJdbcDriver18</artifactId>
            <version>1.8</version>
        </dependency>
maven 中央仓库里面没有,需要手动安装到 maven 本地仓库
mvn install:install-file -Dfile=D:\1\DmJdbcDriver18.jar -DgroupId=com.dm -DartifactId=DmJdbcDriver18 -Dversion=1.8 -Dpackaging=jar
2. druid 配置 application.properties
#数据源1
datasource.no1.driver-class-name: dm.jdbc.driver.DmDriver
datasource.no1.url=jdbc:dm://192.168.0.11:5238/SYSDBA?serverTimezone=UTC&useSSL=false&useUnicode=true&characterEncoding=utf-8
datasource.no1.username=SYSDBA
datasource.no1.password=root123456789
3. 配置类
package org.fh.config;

import java.sql.SQLException;

import javax.sql.DataSource;

import org.apache.ibatis.session.SqlSessionFactory;
import org.mybatis.spring.SqlSessionFactoryBean;
import org.mybatis.spring.annotation.MapperScan;
import org.springframework.beans.factory.annotation.Qualifier;
import org.springframework.beans.factory.annotation.Value;
import org.springframework.context.annotation.Bean;
import org.springframework.context.annotation.Configuration;
import org.springframework.context.annotation.Primary;
import org.springframework.core.io.DefaultResourceLoader;
import org.springframework.core.io.support.PathMatchingResourcePatternResolver;
import org.springframework.jdbc.datasource.DataSourceTransactionManager;

import com.alibaba.druid.pool.DruidDataSource;

/**
 * 说明:第一数据源配置
 * 作者:FH Admin
 * from:fhadmin.cn
 */
@Configuration
@MapperScan(basePackages = MasterDataSourceConfig.PACKAGE, sqlSessionFactoryRef = "masterSqlSessionFactory") //扫描 Mapper 接口并容器管理
public class MasterDataSourceConfig {

……
 //其中的 dataSource.addFilters("wall"); 去掉,否则访问不了数据库
    @Bean(name = "masterDataSource")
    @Primary
    public DataSource masterDataSource() throws SQLException {
        DruidDataSource dataSource = new DruidDataSource();
        dataSource.setDriverClassName(driverClass);
        dataSource.setUrl(url);
        dataSource.setUsername(user);
        dataSource.setPassword(password);
        dataSource.addFilters("stat");
        //dataSource.addFilters("wall");
        return dataSource;
    }

 ……
}
如果本文对你有帮助,别忘记给我个3连 ,点赞,转发,评论,,咱们下期见。
收藏 等于白嫖,点赞才是真情。

转自链接:
https://learnku.com/articles/67079


SpringBoot-14-JdbcTemplate多数据源配置
在上一章节中我们已经介绍了在Springboot中使用JdbcTemplate来完成对mysql数据库的基本操作,本章节主要介绍当我们在项目中需要使用多个数据源的时候JdbcTemplate是怎么进行配置的。本章节是在上章节代码 使用JdbcTemplate链接Mysql数据库基础上进行修改的。
1.JdbcTemplate多数据源配置
在application.yml中设置我们要链接的数据库配置,例子如下:
server:
  port: 8899
spring:
  datasource:
    primary:
      jdbc-url: jdbc:mysql://localhost:3306/mybatis?useUnicode=true&serverTimezone=Asia/Shanghai&characterEncoding=utf-8&useSSL=false
      username: root
      password: root
      driver-class-name: com.mysql.cj.jdbc.Driver
    second:
      jdbc-url: jdbc:mysql://localhost:3306/verse?useUnicode=true&serverTimezone=Asia/Shanghai&characterEncoding=utf-8&useSSL=false
      username: root
      password: root
driver-class-name: com.mysql.cj.jdbc.Driver注:
- 在配置多数据源的时候,和单数据源区别在于
spring:datasource后多设置一个数据源名称,例如primary,second来区分数据库来源。 - 在SpringBoos多数据源配置url中SpringBoot1.x和SpringBoot2.X有区别,SpringBoot1.x使用url进行链接,SpringBoot2.X使用jdbc-url进行链接。
2.对JBDC数据源进行初始化配置
在application.yml中配置过多数据源信息以后,我们需要创建一个配置类去加载这些配置信息,用来对数据库初始化。
@Configuration
public class MyDataSourceConfiguration {

    /**
     * 使用Primary来表示主数据有
     * @return
     */
    @Primary
    @Bean
    @ConfigurationProperties(prefix = "spring.datasource.primary")
    public DataSource primaryDataSource() {
        return DataSourceBuilder.create().build();
    }

    @Bean
    @ConfigurationProperties(prefix = "spring.datasource.second")
    public DataSource secondDataSource() {
        return DataSourceBuilder.create().build();
    }

    @Bean
    public JdbcTemplate primaryJdbcTemplate(@Qualifier("primaryDataSource") DataSource primaryDataSource) {
        return new JdbcTemplate(primaryDataSource);
    }

    @Bean
    public JdbcTemplate secondJdbcTemplate(@Qualifier("secondDataSource") DataSource secondaryDataSource) {
        return new JdbcTemplate(secondaryDataSource);
    }
}
注:
- @Primary表示主数据源,在不指定数据源的情况下使用主数据源
- 为什么不用
@Qualifier指定?当我们不指定的时候,会采用参数的名字来查找Bean,存在的话就注入。 - 当我们创建Bean的时候,默认会使用方法名称来作为Bean的名称,所以这里就对应上了。
在service层进行修改代码
@AllArgsConstructor
@Service
public class StudentServiceImpl implements StudentService {


    private JdbcTemplate primaryJdbcTemplate;

    private JdbcTemplate secondJdbcTemplate;


    @Override
    public List<Student> getAllSutdents() {

        List<Student> students = primaryJdbcTemplate.query("select name,sex,age,mobile,email from student where is_enabled=1", (resultSet, i) -> {
            Student stu = new Student();
            stu.setName(resultSet.getString("name"));
            stu.setSex(resultSet.getString("sex"));
            stu.setAge(resultSet.getInt("age"));
            stu.setMobile(resultSet.getString("mobile"));
            stu.setEmail(resultSet.getString("email"));
            return stu;
        });
        return students;
    }

    @Override
    public int Create(String name,String sex, int age,String mobile, String email) {
        int update = primaryJdbcTemplate.update("INSERT INTO student(name ,sex,age,mobile,email) VALUES(?,?,?,?,?)",
                name, sex, age, mobile, email);
        return update;
    }

    @Override
    public int deleteByName(String name) {
        return primaryJdbcTemplate.update("update student set is_enabled=0 where name = ?", name);
    }
}
以上就是我介绍的JdbcTemplate对多数据源操作,代码测试可以通过http://localhost:8899/student/方法的方式进行测试。
如果您觉得本文不错,欢迎关注我支持,您的关注是我坚持的动力!
原创不易,转载请注明出处,感谢支持!如果本文对您有用,欢迎转发分享!

mybatis-spring-boot-starter中包含了spring-boot-starter-jdbc。

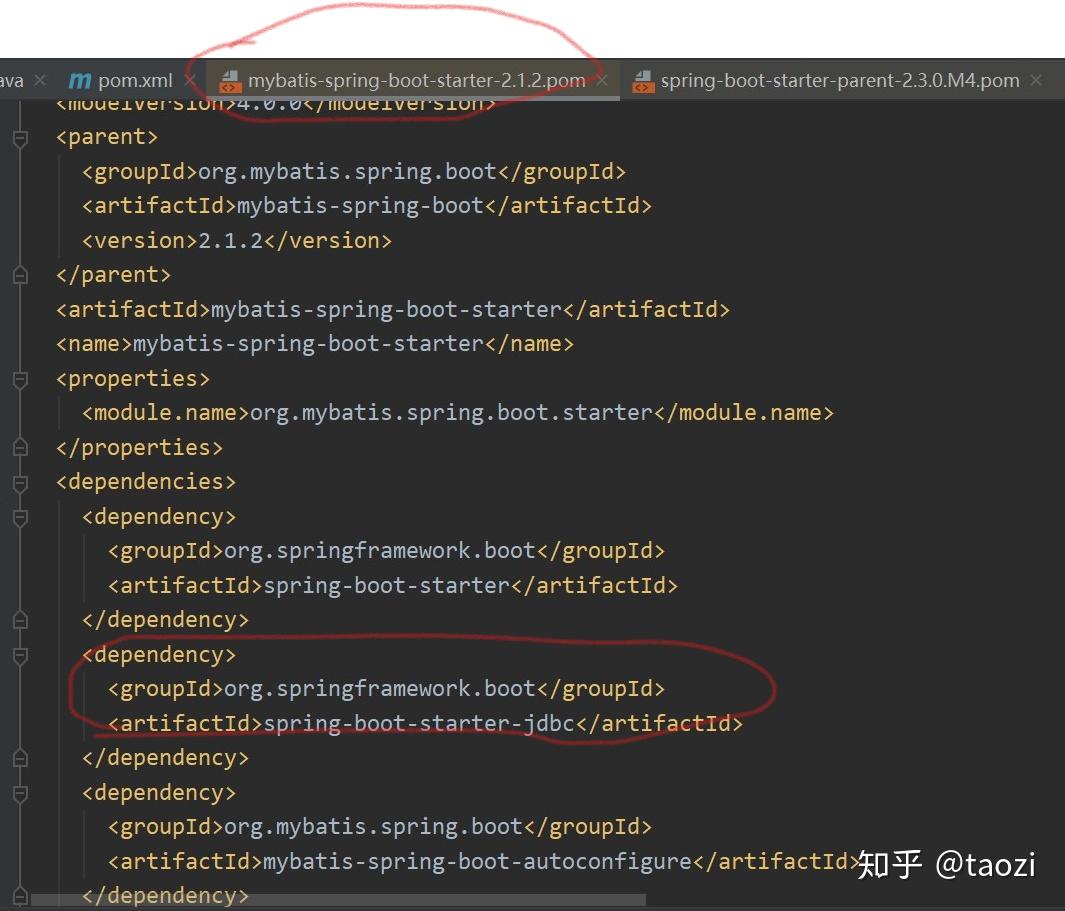
不用, mybatis starter会自己添加 spring-boot-starter-jdbc这个依赖

```
Rainbond开源软件介绍:
Rainbond是国内首个开源的生产级无服务器PaaS。
深度整合基于Kubernetes的容器管理、多类型CI/CD应用构建与交付、多数据中心的资源管理等技术,提供云原生应用全生命周期解决方案,构建应用与基础设施、应用之间及基础设施之间的互联互通生态体系。12月12日,Rainbond正式开源。
[Rainbond详细介绍]
[Rainbond项目地址]
```
Java架构师入门到精通:➡([ Java提升资料])⬅点击免费领取
Spring Boot框架简化了新Spring应用的初始搭建以及开发过程,云帮支持平台部署Spring Boot类应用。
云帮提供Spring Boot配置MySQL服务的示例,去云市一键式部署Spring Boot-MySQL示例
**以下内容是本地创建和运行该示例的过程:**
## 创建示例
使用spring-boot-cli创建示例
```
$ docker run -it --rm \
-v $PWD:/app goodrainapps/spring-boot-cli:1.5.9 spring init --dependencies=web spring-boot-mysql-demo
```
进入示例类文件存放目录
```
$ cd spring-boot-mysql-demo/src/main/java/com/example/springbootmysqldemo
```
添加DemoApplication.java
```
@Controller
@SpringBootApplication
public class DemoApplication {
@RequestMapping("/")
@ResponseBody
String home() {
return "Hello World!";
}
public static void main(String[] args) {
SpringApplication.run(DemoApplication.class, args);
}
}
```
### 构建示例
Java架构师入门到精通:➡([ Java提升资料])⬅点击免费领取
为了加快maven构建,在`setting.xml`中添加了国内的mirror。将`setting.xml`拷贝到您的`spring-boot-mysql-demo`中。
```
$ cd spring-boot-mysql-demo
$ docker run -it --rm \
-v "$PWD":/app/build \
-w /app/build maven:3.5.2-jdk-7-alpine mvn -B -DskipTests=true -s settings.xml clean install
```
### 运行
执行以下命令运行`Hello World`示例
```
$ cd spring-boot-mysql-demo
$ docker run -it --rm -v $PWD:/app -w /app -p 8080:8080 goodrainapps/openjdk:8u131-jre-alpine java -jar target/*.jar
```
访问http://localhost:8080查看运行结果。
## 配置数据库
云帮提供Spring-boot-mysql-demo的相关配置目录结构如下,配置文件内容仅供参考。
详细配置参考下文:
### 连接MySQL
添加以下内容,将此应用与数据库进行连接。
在`pom.xml`内添mysql数据库服务 :
```
<dependency>
<groupId>mysql</groupId>
<artifactId>mysql-connector-java</artifactId>
<version>5.1.9</version>
</dependency>
```
添加JDBC驱动:
```
<dependency>
<groupId>org.springframework.boot</groupId>
<artifactId>spring-boot-starter-jdbc</artifactId>
</dependency>
```
在`application.properties`添加数据库连接信息:
```
spring.datasource.url=jdbc:mysql://${MYSQL_HOST}:${MSYQL_PORT}/demo?createDatabaseIfNotExist=true
spring.datasource.username=${MYSQL_USER}
spring.datasource.password=${MYSQL_PASS}
spring.datasource.driver-class-name=com.mysql.jdbc.Driver
spring.datasource.maxActive=10
spring.datasource.maxIdle=5
spring.datasource.minIdle=2
spring.datasource.initialSize=5
spring.datasource.removeAbandoned=true
```
在源码添加`DatabaseConfig.java`
```
@Configuration
public class DatabaseConfig {
@Bean
@Primary
@ConfigurationProperties(prefix = "spring.datasource")
public DataSource dataSource() {
return new org.apache.tomcat.jdbc.pool.DataSource();
}
}
```
### 数据库初始化
使用 JPA 管理生成实体的映射关系的代码。
```
<dependency>
<groupId>org.springframework.boot</groupId>
<artifactId>spring-boot-starter-data-jpa</artifactId>
</dependency
```
### 数据库重构与迁移
使用LiquiBase,以便将JPA生成实体的映射关系在数据库体现。第一步,在`pom.xml`添加:
```
<dependency>
<groupId>org.liquibase</groupId>
<artifactId>liquibase-core</artifactId>
<version>3.4.1</version>
</dependency>
```
第二步,创建 Liquibase 的修改日志,默认从`db.changelog-master.yaml`读取:
```
databaseChangeLog:
- changeSet:
id: 1
author: <your_name>
changes:
- createTable:
tableName: person
columns:
- column:
name: id
type: int
autoIncrement: true
constraints:
primaryKey: true
nullable: false
- column:
name: first_name
type: varchar(255)
constraints:
nullable: false
- column:
name: last_name
type: varchar(255)
constraints:
nullable: false
```
## 模板渲染
Thymeleaf可以帮助渲染`XML`、`XHTML`、`HTML5`内容的模板引擎,它也可以轻易的与`Spring MVC`等Web框架集成作为Web应用的模板引擎。在`pom.xml`中添加:
```
<dependency>
<groupId>org.springframework.boot</groupId>
<artifactId>spring-boot-starter-thymeleaf</artifactId>
</dependency>
```
## docker化改造
为了支持 Spring Boot MySQL demo 轻松部署在云帮,将demo使用Dockerfile构建镜像,在云帮实现一键式部署
```
#使用配置好环境的父镜像
FROM maven:3.5.2-jdk-7-alpine
#创建demo源码工作目录
RUN mkdir /app
#将本地源码拷贝到镜像中
COPY . /app/
#指定工作目录
WORKDIR /app
#声明映射端口
EXPOSE 5000
#指定maven的配置文件,文件内制定新的mirror地址
RUN mvn -B -DskipTests=true clean install
#启动脚本
ENTRYPOINT ["/app/run.sh"]
```
### 构建镜像
```
$ docker build -t goodrainapps/spring-boot-mysql-demo .
```
### 运行
```
#运行mysql
$ docker run -d --name mysql -e MYSQL_ROOT_PASSWORD=123456 mysql
```
```
#运行示例
$ docker run -it --rm --link mysql \
-p 5000:5000 \
-e MYSQL_HOST=mysql \
-e MYSQL_PORT=3306 \
-e MYSQL_USER=root \
-e MYSQL_PASS=123456 \
goodrainapps/spring-boot-mysql-demo
```
Java架构师入门到精通:➡([ Java提升资料])⬅点击免费领取
访问http://localhost:5000查看Spring Boot 框架配置MySQL服务的运行界面

之前写过关于 Apache Pulsar 的简单示例,用来了解如何使用 Pulsar 这个新生代的消息队列中间件,但是如果想要在项目中使用,还会欠缺很多,最明显的就是 集成复杂,如果你用过其他消息中间件,比如 Kafka、RabbitMq,只需要简单的引入 jar,就可以通过注解+配置快速集成到项目中。
开始一个 Pulsar Starter
既然已经了解了 Apache Pulsar,又认识了 spring-boot-starter,今天不妨来看下如何写一个 pulsar-spring-boot-starter 模块。
目标
写一个完整的类似 kafka-spring-boot-starter(springboot 项目已经集成到 spring-boot-starter 中),需要考虑到很多 kafka 的特性, 今天我们主要实现下面几个模板
- 在项目中够通过引入 jar 依赖快速集成
- 提供统一的配置入口
- 能够快速发送消息
- 能够基于注解实现消息的消费
定义结构
└── pulsar-starter
    ├── pulsar-spring-boot-starter
    ├── pulsar-spring-boot-autoconfigure
    ├── spring-pulsar
    ├── spring-pulsar-xx
    ├── spring-pulsar-sample
└── README.md整个模块的结构如上其中pulsar-starter作为一个根模块,主要控制子模块依赖的其他 jar 的版本以及使用到的插件版本。类似于 Spring-Bom,这样我们在后续升级 时,就可以解决各个第三方 jar 的可能存在版本冲突导致的问题。
- pulsar-spring-boot-starter
该模块作为外部项目集成的直接引用 jar,可以认为是 pulsar-spring-boot-starter 组件的入口,里面不需要写任何代码,只需要引入需要的依赖(也就是下面的子模块)即可
- pulsar-spring-boot-autoconfigure
该模块主要定义了 spring.factories 以及 AutoConfigure、Properties。也就是自动配置的核心(配置项+Bean 配置)
- spring-pulsar
该模块是核心模块,主要的实现都在这里
- spring-pulsar-xx
扩展模块,可以对 spring-pulsar 做更细化的划分
- spring-pulsar-sample
starter 的使用示例项目
实现
上面我们说到实现目标,现在看下各个模块应该包含什么内容,以及怎么实现我们的目标
- 入口 pulsar-spring-boot-starter
上面说到 starter 主要是引入整个模块基础的依赖即可,里面不用写代码。
<dependencies>
    <dependency>
        <groupId>com.sucl</groupId>
        <artifactId>spring-pulsar</artifactId>
        <version>${project.version}</version>
    </dependency>

    <dependency>
        <groupId>com.sucl</groupId>
        <artifactId>pulsar-spring-boot-autoconfigure</artifactId>
        <version>${project.version}</version>
    </dependency>
</dependencies>- pulsar-spring-boot-autoconfigure
- 添加 spring-boot 基础的配置
<dependencies>
     <dependency>
         <groupId>org.springframework.boot</groupId>
         <artifactId>spring-boot</artifactId>
     </dependency>

     <dependency>
         <groupId>org.springframework.boot</groupId>
         <artifactId>spring-boot-starter-logging</artifactId>
     </dependency>

     <dependency>
         <groupId>org.springframework.boot</groupId>
         <artifactId>spring-boot-configuration-processor</artifactId>
         <optional>true</optional>
     </dependency>
</dependencies>- 定义自动配置类PulsarAutoConfiguration:
- 引入Properties,基于EnableConfigurationProperties与spring-boot-configuration-processor解析 Properties 生成对应spring-configuration-metadata.json文件,这样编写 application.yml 配置时就可以自动提示配置项的属性和值了。
- 构建一些必须的 Bean,如 PulsarClient、ConsumerFactory、ConsumerFactory 等
- Import 配置 PulsarAnnotationDrivenConfiguration,这个主要是一些额外的配置,用来支持后面的功能
@Configuration
@EnableConfigurationProperties({PulsarProperties.class})
@Import({PulsarAnnotationDrivenConfiguration.class})
public class PulsarAutoConfiguration {

    private final PulsarProperties properties;

    public PulsarAutoConfiguration(PulsarProperties properties) {
        this.properties = properties;
    }

    @Bean(destroyMethod = "close")
    public PulsarClient pulsarClient() {
        ClientBuilder clientBuilder = new ClientBuilderImpl(properties);
        return clientBuilder.build();
    }

    @Bean
    @ConditionalOnMissingBean(ConsumerFactory.class)
    public ConsumerFactory pulsarConsumerFactory() {
        return new DefaultPulsarConsumerFactory(pulsarClient(), properties.getConsumer().buildProperties());
    }

    @Bean
    @ConditionalOnMissingBean(ProducerFactory.class)
    public ProducerFactory pulsarProducerFactory() {
        return new DefaultPulsarProducerFactory(pulsarClient(), properties.getProducer().buildProperties());
    }

}- 配置 spring.factory
在目录src/main/resources/META-INF下创建spring.factories,内容如下:
org.springframework.boot.autoconfigure.EnableAutoConfiguration=\
com.sucl.pulsar.autoconfigure.PulsarAutoConfiguration- spring-pulsar
- 添加 pulsar-client 相关的依赖
<dependencies>
     <dependency>
         <groupId>org.apache.pulsar</groupId>
         <artifactId>pulsar-client</artifactId>
     </dependency>

     <dependency>
         <groupId>org.springframework.boot</groupId>
         <artifactId>spring-boot-autoconfigure</artifactId>
     </dependency>

     <dependency>
         <groupId>org.springframework</groupId>
         <artifactId>spring-messaging</artifactId>
     </dependency>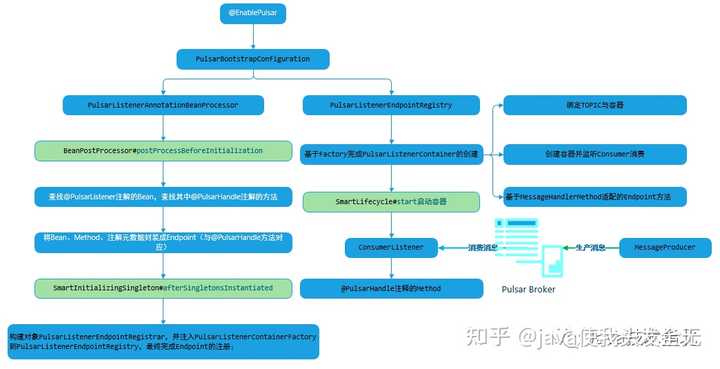
</dependencies>- 定义 EnablePulsar,之前说到过,@Enable 注解主要是配合 AutoConfigure 来做功能加强,没有了自动配置,我们依然可以使用这些模块的功能。这里做了一件事,向 Spring 容器注册了两个 Bean
- PulsarListenerAnnotationBeanProcessor 在 Spring Bean 生命周期中解析注解自定义注解 PulsarListener、PulsarHandler,
- PulsarListenerEndpointRegistry 用来构建 Consumer 执行环境以及对 TOPIC 的监听、触发消费回调等等,可以说是最核心的 Bean
@Target({ElementType.TYPE})
@Retention(RetentionPolicy.RUNTIME)
@Import({PulsarListenerConfigurationSelector.class})
public @interface EnablePulsar {

}- 定义注解,参考 RabbitMq,主要针对需要关注的类与方法,分别对应注解@PulsarListener、@PulsarHandler,通过这两个注解配合可以让我们监听到关注的 TOPIC, 当有消息产生时,触发对应的方法进行消费。
@Target({ElementType.TYPE})
@Retention(RetentionPolicy.RUNTIME)
public @interface PulsarListener {

    /**
     *
     * @return TOPIC 支持SPEL
     */
    String[] topics() default {};

    /**
     *
     * @return TAGS 支持SPEL
     */
    String[] tags() default {};
}

@Target({ElementType.METHOD})
@Retention(RetentionPolicy.RUNTIME)
public @interface PulsarHandler {

}- 注解@PulsarListener 的处理流程比较复杂,这里用一张图描述,或者可以通过下面 github 的源代码查看具体实现

flow
- spring-pulsar-sample
按照下面的流程,你会发现通过简单的几行代码就能够实现消息的生产与消费,并集成到项目中去。
- 简单写一个 SpringBoot 项目,并添加 pulsar-spring-boot-starter
<dependencies>
    <dependency>
        <groupId>com.sucl</groupId>
        <artifactId>pulsar-spring-boot-starter</artifactId>
        <version>${project.version}</version>
    </dependency>

    <dependency>
        <groupId>org.springframework.boot</groupId>
        <artifactId>spring-boot-starter-web</artifactId>
    </dependency>
</dependencies>- 添加配置
cycads:
  pulsar:
    service-url: pulsar://localhost:6650
listener-topics: TOPIC_TEST- 编写对应消费代码
@Slf4j
@Component
@PulsarListener(topics = "#{'${cycads.listener-topics}'.split(',')}")
public class PulsarDemoListener {

    @PulsarHandler
    public void onConsumer(Message message){
        log.info(">>> 接收到消息:{}", message.getPayload());
    }

}- 向 Pulsar Broker 发送消息进行测试
@Slf4j
@RunWith(SpringRunner.class)
@ContextConfiguration(classes = {ContextConfig.class})
@Import({PulsarAutoConfiguration.class})
public class ProducerTests {

    @Autowired
    private ProducerFactory producerFactory;

    @Test
    public void sendMessage() {
        Producer producer = producerFactory.createProducer("TOPIC_TEST");
        MessageId messageId = producer.send("this is a test message");
        log.info(">>>>>>> 消息发送完成:{}", messageId);
    }

    @Configuration
    @PropertySource(value = "classpath:application-test.properties")
    static class ContextConfig {
        //
    }
}- 控制台可以看到这样的结果
2023-02-26 19:57:15.572 INFO 26520 --- [pulsar-01] c.s.p.s.listener.PulsarDemoListener : >>> 接收到消息:GenericMessage [payload=this is a test message, headers={id=f861488c-2afb-b2e7-21a1-f15e9759eec5, timestamp=1677412635571}]知识点
- Pulsar Client
基于 pulsar-client 提供的 ConfigurationData 扩展 Properties;了解 Pulsar Client 如何连接 Broker 并进行消息消费,包括同步消费、异步消费等等
- spring.factories
实现 starter 自动配置的关键,基于 SPI 完成配置的自动加载
- Spring Bean 生命周期
通过 Bean 生命周期相关扩展实现注解的解析与容器的启动,比如 BeanPostProcessor, BeanFactoryAware, SmartInitializingSingleton, InitializingBean, DisposableBean 等
- Spring Messaging
基于回调与 MethodHandler 实现消息体的封装、参数解析以及方法调用;
源码示例
https://github.com/sucls/pulsar-starter.git
结束语
如果你看过 spring-kafka 的源代码,那么你会发现所有代码基本都是仿造其实现。一方面能够阅读 kafka client 在 spring 具体如何实现;同时通过编写自己的 spring starter 模块,学习 整个 starter 的实现过程。